Syntax Parsing
Text parsing is performed by one of the Parser non-visual components. In the very basic version, it controls syntax highlighting. In the case of more advanced parsers, it enables additional features such as code completion, code outlining, code formatting, and syntax error underlining.
If there's no parser assigned, SyntaxEdit or TextEditor does not perform any parsing-related functions. To be able to use those features, you need to create a Parser component explicitly and assign it via the Lexer property of either these controls directly or their TextSource.
C#/VisualBasic (Roslyn) and TypeScript/JavaScript parsers
The package includes parsers based on Microsoft Code Compiler technology (Roslyn) and Microsoft TypeScript compiler.
These parsers provide full syntax and semantic model of the text edited by SyntaxEdit control. It enables additional features such as code completion, code outlining, code formatting, highlighting types in different colors, and underlying syntax and semantic errors and warnings to be identical to the ones found in the Microsoft Visual Studio editor.
LSP Parsers
LangServer-based parsers rely on external servers to provide features like auto complete, go to definition, find all references, and alike. The Code Editor package includes parsers based on this technology for C/C++, Java, Python, Lua XML, and PowerShell. There are two variations of each parser - one that relies on the Language server to be installed on the target machine and one that includes all required payload (such as clang libraries for c/c++ or embedded python distribution) in the form of embedded resources. Java embedded parser contains LSP-server files but not Java installation itself, which needs to be installed on target machines independently.
Advanced Parsers
The Code Editor package comes with several advanced parsers, each one designed to perform syntax highlighting for certain languages. Each of these parsers is derived from the SyntaxParser class implementing ISyntaxParser interface and performs syntax analysis of the text in a specific programming language to provide advanced code editing features discussed above. These parsers use hard-coded parsing algorithms instead of generic regular-expression-based rules, making them significantly faster than generic ones (these will be explained further). Currently, we have advanced parsers for the following languages: Python, C#, J#, Visual Basic.NET, Ansi-C, VBScript, JavaScript, HTML, SQL, T4, XML, and XAML. These parsers perform complete syntax parsing of the source code to build the syntax tree, which is used to implement all mentioned features. Please note that these parsers might not support full language specification, especially language constructs which were added to these programming languages recently.
Python and XAML parsers are implemented in their own namespaces/assemblies, Alternet.Syntax.Parsers.Python and Alternet.Syntax.Parsers.XAML respectively.
For Python/IronPython, we have implemented a complete semantic analysis of the text, which builds a semantic model of the whole text displayed in the editor (and also processes included files). The semantic model is used by the Code Completion service to provide auto-completion and method parameters help. This approach was inspired by studying Microsoft Code Analysis ("Roslyn") implementation, which will be explained below.
Generic parsers
Writing your own parser to comply with a programming language specification is a non-trivial task, not to mention keeping it up to date with full language specifications as the language evolves. However, for a simple task of syntax highlighting, it's normally not required. To perform syntax highlighting, you can rely on a generic parsing engine, which uses finite-state automaton rules driven by regular expressions matching the parsed text. Although creating good syntax-highlighting rules for some complex languages can still be tricky, you will rarely, if ever, have to do it yourself. The Code Editor includes more than 30 ready-to-use syntax schemes for the most commonly used modern programming languages. In rare cases, you need to implement a parser for some custom language; one of these parsers can be a good starting point. Syntax schemes are stored on disk as .xml files, and the built-in visual design-time parser editor is provided to simplify the process of their creation. If you need most of these languages in your application, consider using one of the SchemeParser descendants, which contains appropriate language schemes in the form of an assembly resource.
Creating a new generic parser is described in the Advanced Topics section of the documentation.
TextMate parser
TextMate parser is based on the TextMate grammar that powers syntax highlighting and advanced text editing features of Visual Studio Code.
TextMate parser uses Oniguruma regex engine and includes grammar definitions for 40+ programming languages. On top of syntax highlighting, it supports features like indent-based outlining and structure guidelines, code snippets, and code completion for the symbols already found in the text.
Creating own Generic Parser Schema
Although the Code Editor comes with a collection of parsers, creating a new one may sometimes be necessary. In this chapter, we will develop a new parser for some trivial fictitious language.
First, let us informally describe the language we are willing to parse. The valid text in this language consists of zero or more groups enclosed in curly brackets ("{", "}"), each containing zero or more numbers separated by commas. We want to distinctly highlight punctuation symbols and numbers and report erroneous input.
The first step is to create a new Parser object by dropping it from the toolbox and assigning it to some SyntaxEdit by picking the newly created parser from the list of choices appearing for the Lexer property of the editor.
After having done this, we can start exploring the SyntaxBuilder. It is invoked by pressing the "..." button for the Scheme property of the parser object in the Properties window.
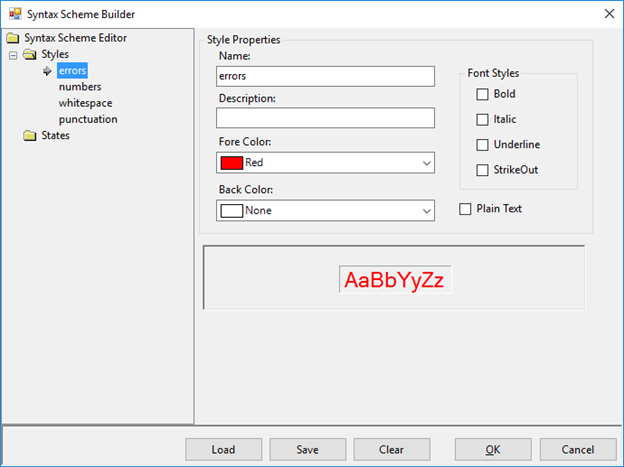
Now you should see the SyntaxBuilder dialog box appears. If you wanted to use some existing scheme, you would have pressed the Load button. However, this time we will create a new scheme from scratch. After completing it, you can press the Save button to make it possible to use this new scheme in other projects.
The next thing to do is to define syntax highlighting styles used in the scheme. This is accomplished by clicking the right mouse button on the Styles node to bring the context menu and choosing the Add Style command.
After creating a style, you should name it and define its visual attributes. For this example, we will need four styles: number, punctuation, whitespace, and error. Let us define numbers with olive color and italic text style, punctuation symbols to be blue, and syntax errors to have a red background and white foreground. The whitespace style is defined as having no distinct markup.
Note that when the editor is linked to the parser, it takes font styles to render text fragments from the parser's styles instead of using its own FontStyle. It applies to all parsers, not just generic ones.
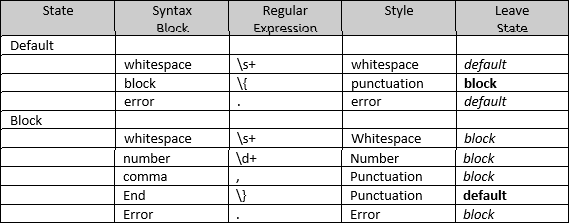
Then we define the states of the parser. For our example language, there will be two states: default and block. States are defined similarly to styles by choosing the Add State command in the context menu when clicking on the States node. In turn, states contain syntax blocks created by the Add Syntax Block command from the context menu of a state.
A syntax parser is essentially a state machine driven by the text. Transition conditions are expressed in terms of regular expressions, which are checked against the parsed text at the current position up to the next end of the line. Expressions are tried in the syntax block definition order. The first successful match determines the syntax block. The text position is advanced by the length of the match, and the text is assigned the style specified for that syntax block. The matched text is additionally matched against the list of the reserved words associated with this syntax block. If a match occurs, the style defined by the ResWord Style is used instead of the one defined by the Style property. The state of the state machine is changed according to the Leave State property of the syntax block, which can specify any of the states, including the same state in which the syntax block resides, meaning no state transition is to take place.
The state machine for the language we are parsing is described in the following table and deserves some comments.
The whitespace syntax block is only necessary because of the presence of a match all error syntax block. In the more common case where no error highlighting is used, no style (the same as the whitespace style that we have defined) would be used for the text that does not match any syntax blocks. The error syntax block is the last in the sequence and matches a single character that any of the preceding rules has not matched. The block syntax block is matched when the opening curly bracket is met. The bracket itself is assigned the punctuation style, and the state machine changes its state into the block state (note that state name, style name, and syntax block style name coincidences are not required).
In the block state, the whitespace, and error syntax blocks serve the same purpose as in the default state. Number and comma syntax blocks cause numbers and commas to have the corresponding styles, and the end syntax block, which matches the closing curly bracket, causes the transition back to the default state.