Code Editor Basic Features (WinForms)
Code Editor matches most of the Visual Studio code editor features, such as Selection, Code Completion, Code Outlining, Search/Replace, Navigation and Undo, and many more.
Editing features
Code Editor provides an extended set of methods and properties for text modifications and navigating within the text content. Most of these methods are called implicitly when the user edits the text in the edit control or presses the arrows and PageUp, PageDown, End, or Home keys. The most commonly used methods and properties are listed below:
Position - gets or sets the current position (Column, Row) within the text.
NewLine - inserts new line at the current position and number of spaces or tabs according to the indentation options.
Insert - inserts string at the current position.
DeleteRight - deletes a number of characters to the right of the current position.
DeleteLeft - deletes a number of characters to the right of the current position.
BreakLine - inserts a line break at the given position.
UnBreakLine - joins two lines at the end of a current line.
MoveCharLeft - moves the current position to one character left.
MoveCharRight - moves the current position to one character right.
MoveLineDown - moves the current position to one line below.
MoveLineUp - moves the current position to one line above.
.* MoveFileBegin - moves the current position to the beginning of the text.
.* MoveFileEnd - moves the current position to the end of the text.
All such modifications are translated to the underlying TextSource component, which also maintains the list of all edits so a user can undo them.
Selection
Just like almost any text editor, the SyntaxEdit supports a concept of text selection and a wide range of operations on it. All the selection-related aspects are controlled via the Selection property. Selections can be of two types: traditional stream-type selection and block-type selection. The latter can be created by navigating the text with the navigation keys and holding Shift and Alt keys together.
BackColor and ForeColor define the background and the foreground colors used to mark the currently selected text. Selection.InActiveBackColor and Selection.InActiveForeColor are used when the editor is out of focus.
The Options controls different aspects of the behavior of selections.
DisableSelection completely disables selection support in the editor.
DisableDragging disables drag-n-drop operations on the selection.
SelectBeyondEol allows selection in the virtual space (if the NavigateOptions.BeyondEol is enabled)
UseColors instructs the editor to use the same foreground colors for selected text as the ones used for unselected text (i.e., any syntax highlighting will be visible). Note for this to be useful; the section background color must be in contrast with all possible foreground colors.
HideSelection causes the selection to become invisible when the editor loses focus.
SelectLineOnDblClick allows the user to select the entire line by double-clicking on it.
DeselectOnCopy causes the selection to be removed after the user performs copy selection to clipboard operation.
PersistentBlocks causes the selection to be retained after the user has finished making it and has started other navigation.
OverwriteBlocks causes the new input to overwrite the currently selected text.
SmartFormat allows formatting blocks when pasting according to the rules defined by the syntax parser.
WordSelect causes whole words to be selected rather than individual characters when using mouse selection.
DrawBorder causes Edit control to draw border around selection
SelectLineOnTripleClick allows selecting the whole line rather than a single word by triple clicking the mouse
DeselectOnDblClick causes selection to be cleared by mouse dblclick.
ConvertToSpacesOnPaste specifies that selection should convert all tabs to spaces in the text being pasted when the Lines.UseSpaces is on.
RtfClipboard causes the selection to copy its content in text and RTF formats.
ClearOnDrag causes selected text to be cleared after dragging from an external source
CopyLineWhenEmpty allows copying whole line when selection is empty
DisableCodeSnippetOnTab - disables code snippets insertion when pressing Tab key.
SelectWordOnCtrlClick causes the word under the cursor to be selected when a user holds the Ctrl key
ExtendedBlockMode causes text being typed to be inserted into all selected lines within the rectangular block.
It is possible to programmatically select text by setting SelectionStart and SelectionLength properties, or with the help of SetSelection method.
The selected text can be retrieved or set via the SelectedText property.
A developer can perform various operations on the current selection. Some of them are:
IsEmpty checks whether there is any text selected.
SetSelection selects the specified rectangular area.
SelectAll() selects the whole document.
Cut()/Copy()/Paste() performs standard operations like copying text to the clipboard, cutting text to the clipboard and pasting text from the clipboard.
IsPosInSelection checks if the specified position lies within selection.
Clear() clears selection (this does not affect the text itself).
Move moves or copies the currently selected text to a new location.
SmartFormat() formats the selected text according to the rules defined by the syntax parser.
LowerCase()/UpperCase()/Capitalize() change the case of the currently selected text.
UnIndent()/UnIndent() change the indent of the currently selected text.
In fact, if some action can be performed by the user, it can also be performed programmatically:
    if(!edit.Selection.IsEmpty)
    edit.Selection.SelectedText =
    "(" + edit.Selection.SelectedText + ")";
This code encloses the currently selected text in brackets.
Searching and Replacing
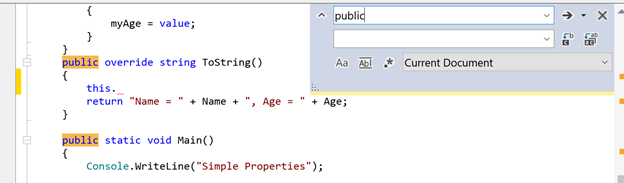
Among the operations that can be performed on the text, there are operations of searching and replacing text strings. Unlike the standard multi-line text editor, which does not implement such functionality, the SyntaxEdit control comes with built-in support for them. It's ready to use out-of-the-box: when the user presses the Ctrl+F key combination, the search dialog box appears:
The text-replace dialog can be activated by pressing Ctrl+H. Besides using the UI to control the process, all the operations can be executed programmatically by calling the corresponding methods of the SyntaxEdit.
For example, to find some string, you could use the following code:
edit.Find("some string");
Or, with regular expressions:
    edit.Find(" ", SearchOptions.RegularExpressions, new
    System.Text.RegularExpressions.Regex("a.?z"));
To activate the Search Dialog:
edit.DisplaySearchDialog();
Moreover, the Search and Replace dialog box functionality is not hardwired: you can replace the dialog box with your own by implementing the ISearchDialog interface, and assigning it to the editor by setting its SearchDialog property. The built-in dialog can serve as a good example and a starting point.
If you need to perform the Search and Replace operation without any user interaction, you can use the ReplaceAll method.
I.e.:
    edit.ReplaceAll("bad", "good", SearchOptions.WholeWordsOnly |
    SearchOptions.EntireScope, out count);
After this, every occurrence of a "bad" word in the entire text will be replaced by a "good" word.
Note that this would move the cursor position to the place where the last replacement has been made, so if you need it to be unnoticeable for the user, you need to enclose this call in the code which saves and restores the current cursor position:
    System.Drawing.Point pos;
    pos = edit.Position;
    edit.ReplaceAll("bad", "good", SearchOptions.WholeWordsOnly |
    SearchOptions.EntireScope, out count);
    edit.Position = pos;
Search/Replace function can work across multiple documents. To allow the search to find text in multiple editors, you will need to set SearchManager.Shared to true and provide a list of editors to perform a search in its InitSearch event handlers and return/navigate to the appropriate editor in GetSearch event handler:
    SearchManager.SharedSearch.Shared = true;
    SearchManager.SharedSearch.InitSearch +=
        new InitSearchEvent(DoInitSearch);
    SearchManager.SharedSearch.GetSearch +=
        new GetSearchEvent(DoGetSearch);

    private void DoInitSearch(object sender, InitSearchEventArgs e)
    {
        e.Search = GetActiveSyntaxEdit() as ISearch;
        foreach (var edit in editors.Values)
        {
            edit.SearchGlobal = true;
            e.SearchList.Add(edit.Source.FileName);
        }
    }

    private void DoGetSearch(object sender, GetSearchEventArgs e)
    {
        foreach (var edit in editors.Values)
        {
            if (edit.Source.FileName == e.FileName)
            {
                e.Search = edit as ISearch;
                break;
            }
        }
    }
Scroll Bars and Split View
The appearance and behavior of scrollbars are controlled by the Scrolling property.
The ScrollBars property determines which scrollbars and under what conditions appear on the SyntaxEdit. It can take one of the following values:
<xref:System.Windows.Forms.RichTextBoxScrollBars.None> - neither horizontal, nor vertical scrollbar ever appear
<xref:System.Windows.Forms.RichTextBoxScrollBars.Horizontal> - horizontal scrollbar appears if necessary; vertical one never appears
<xref:System.Windows.Forms.RichTextBoxScrollBars.Vertical> - vertical scrollbar appears if necessary; horizontal one never appears
<xref:System.Windows.Forms.RichTextBoxScrollBars.Both> - both horizontal and vertical scrollbars appear if necessary
<xref:System.Windows.Forms.RichTextBoxScrollBars.ForcedHorizontal> - horizontal scrollbar is always visible; vertical one never appears
<xref:System.Windows.Forms.RichTextBoxScrollBars.ForcedVertical> - vertical scrollbar is always visible; horizontal one never appears
<xref:System.Windows.Forms.RichTextBoxScrollBars.ForcedBoth> - both horizontal and vertical scrollbars are always visible
The behavior of the scrollbars is controlled by ScrollingOptions.
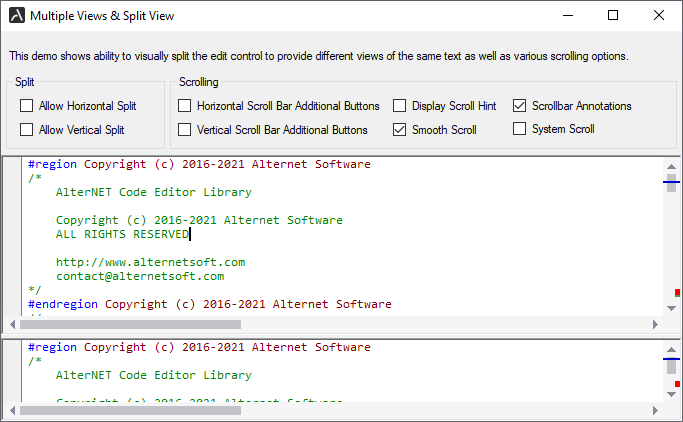
You can also use Scrolling.Options to allow SyntaxEdit to split its content. Note that SyntaxEdit's Dock must be set to DockStyle.Fill. Otherwise, this feature will not work. Splitters are displayed in the left-bottom corner for vertical splitting and the right-top corner for horizontal splitting.
SmoothScroll - if set, the editor's content is updated as the user drags the scrollbar. Otherwise, the content is updated after the user releases the scrollbar thumb. Disabling this option may improve performance on slow machines.
ShowScrollHint - if set, a hint window showing the new number of the topmost line, is displayed whenever the user drags the scrollbar.
UseScrollDelta - if set, editor window content is scrolled by several characters when caret becomes invisible rather than one character
SystemScrollbars - if set, system scroll bars are displayed; otherwise, custom scrollbars are used.
FlatScrollbars - if set, scroll bars are displayed in flat style. This option works only if SystemScrollBars is on.
AllowSplitHorz - allows displaying horizontal splitting buttons in the scroll area. This option works if SystemScrollBars is off and the control has the Dock property set to DockStyle.Fill.
AllowSplitVert - allows displaying a vertical splitting button in the scroll area. This option works if SystemScrollBars is off and the control has the Dock property set to DockStyle.Fill.
HorzButtons - allows displaying additional buttons in the horizontal scrolling area. This option works only if SystemScrollBars is off.
VertButtons - allows displaying additional buttons in the vertical scrolling area. This option works only if SystemScrollBars is off.
VerticalScrollBarAnnotations - allows displaying scroll bar annotations that show special items, such as line modifications, syntax errors, search results bookmarks, and the caret position, throughout the entire document within the scroll bar. Individual annotation kinds are controlled by Annotations property.
Visual Themes
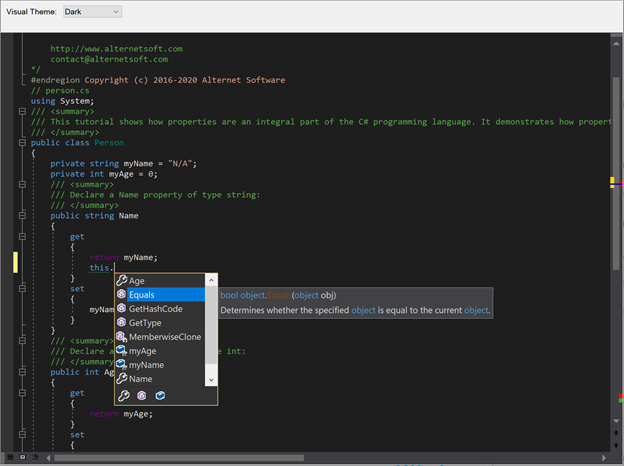
Visual themes allow changing the appearance of all graphical elements in the editor by setting VisualThemeType or VisualTheme type properties. Light and Dark visual themes are included, and custom appearance can be configured via a custom visual theme.
Gutter
The gutter is the area to the left of the text, the purpose of which is to display miscellaneous indicators for the corresponding lines of text. These indicators include bookmark indicators, line wrapping indicators, line style icons, line numbers, outlining buttons, and line modification markers.
All the images displayed in the gutter are contained in the gutters image list. The following code gives an example of how to add a custom icon to this list from another image list (for example, the one dropped on the form during design time):
edit.Gutter.Images.Images.Add(imageList1.Images[0]);
The mechanism of the line styles icons allows you to define how the editor will display certain lines of the text.
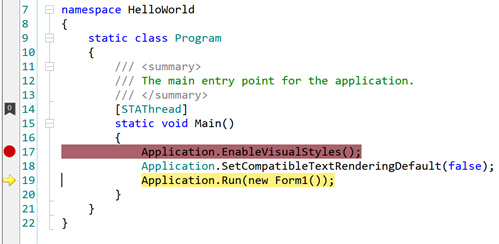
The most common use for this is the indication of breakpoint lines and of the current execution point.
For example, the following code defines the style to be used for breakpoints.
    style_id = edit.LineStyles.AddLineStyle("breakpoint",
    Color.White, Color.Red, Color.Gray, 11, LineStyleOptions.BeyondEol);
(Note in the current version, image # 11 corresponds to the built-in breakpoint indicator image, and #12 corresponds to the current execution point image.
Later on, some lines of the text can be assigned the style:
edit.Source.LineStyles.SetLineStyle(line_no, style_id);
(Note that here and in the other places of this document, line numbers start at 0.)
Note: Every line can have at most one style at any given time. If you need to remove line style for some particular line, call:
edit.Source.LineStyles.RemoveLineStyle(line_no);
For SyntaxEdit control appearance of the gutter is controlled by the following properties: Width, BrushColor, PenColor and Visible. Width property specifies the width of the gutter area, BrushColor specifies the background color of the gutter area, PenColor specifies the color of the gutter line, and Visible indicates whether or not to draw the gutter. Note that the gutter can adjust its width if line numbers or outlining is on and painted on the gutter. SyntaxEdit allows drawing line numbers to indicate the position of the visible lines inside the document visually. To enable line numbers, you need to set PaintLineNumbers to true. Turning PaintLinesOnGutter option enables drawing line numbers on the gutter area; turning it off causes line numbers to be painted immediately after the gutter area. The appearance of line numbers are controlled by the IGutter's properties: LineNumbersStart, LineNumbersForeColor, LineNumbersBackColor, LineNumbersAlignment, LineNumbersLeftIndent and LineNumbersRightIndent, which are intuitively understandable.
Like Microsoft Visual Studio editor, SyntaxEdit provides the ability to track modified lines visually. To enable this feature, you need to turn PaintLineModificators on. When LineModificators are on, they indicate lines that were changed since the last saving. New changes are marked with Yellow color; changes that were done before the last saving are marked with Lime color. Colors can be customized using LineModificatorChangedColor and LineModificatorSavedColor properties.
Reaction to mouse clicks and double-clicks on the gutter area can be implemented by assigning handlers to the GutterClick and GutterDblClick events.
Bookmarks
Just as with often-used books, the process of navigating the text can be made more efficient by using bookmarks. Two kinds of bookmarks are supported by the SyntaxEdit: plain and numbered. The former can be toggled for the current line using the Ctrl+K Ctrl+K key combination sequence and can be navigated in a cyclical manner using the Ctrl+K Ctrl+N (next bookmark) or Ctrl+K Ctrl+P (previous bookmark). The numbered bookmarks have a different flavor: there can be up to ten bookmarks, each having a number associated with it.
Toggling the numbered bookmark is performed using the Ctrl+K Ctrl+#, and navigation to the specific bookmark is performed by pressing the Ctrl+# key combination (where # is any of the digits from 0 to 9). There can be only one plain bookmark in any line. Numbered bookmarks do not have such a limitation. However, only the indicator for the first bookmark in the line will be displayed in the gutter area if PaintBookMarks is set to true.
Like most other things in the editor, bookmarks can be manipulated programmatically. Note that the list of bookmarks belongs to the text source, so multiple views of the same source share the same set of bookmarks.
The following code snippet sets the plain bookmark at the current position:
    System.Drawing.Point pos = edit.Position;
    edit.Source.BookMarks.SetBookMark(pos, int.MaxValue);
To set the numbered bookmark, replace int.MaxValue by the bookmark number (0..9).
To clear all the bookmarks set in the text source, call the ClearAllBookMarks() method:
edit.Source.BookMarks.ClearAllBookMarks();
Navigating to the location defined by a particular bookmark can be performed as follows:
edit.Source.BookMarks.GotoBookMark(index);
Code Editor supports named bookmarks with descriptions and hyperlinks. The user may see a description in a tooltip window when moving the cursor over the bookmark and launching the browser with the specified URL when clicking on the bookmark. Such bookmarks can be set using the following code:
    edit.Source.BookMarks.SetBookMark(edit.Position, 0,
    "Bookmark1", "This is Named Bookmark", "www.alternetsoft.net");
If you need to have custom images, you can change the bookmark indicator images by assigning a custom image list:
    edit.Gutter.BookMarkImageIndex =
    edit.Gutter.Images.Images.Count;
    edit.Gutter.Images.Images.Add(imageList1.Images[0]);
(This code uses the first image from the imageList1, which you could, for example, create by just dropping a new Image List from the toolbox on the form. For more examples of working with the gutter, refer to the corresponding section of this manual.)
You can configure bookmarks navigation to work across multiple documents. These documents should be added to the BookMarkManager class, and every document should have the FileName property assigned.
    BookMarkManager.Register(edit.Source);
    BookMarkManager.SharedBookMarks.Activate += new
    EventHandler<ActivateEventArgs>(DoActivate);
    private void DoActivate(object sender, ActivateEventArgs e)
    {
        foreach (var edit in editors.Values)
        {
            if (edit.Source.FileName == e.FileName)
            {
                ActivateEditorTab(editor);
                break;
            }
        }
    }
In this mode, all bookmarks will be stored in a global list inside BookmarkManager instead of every individual SyntaxEdit control allowing global navigation through them.
Code Completion (Intellisense)
Although the primary purpose of an editor is to be a convenient tool for the user to enter the text, quite often, guidance from the editor can significantly improve the effectiveness of the work process. When editing a text which has some structure (i.e., a computer program in some language), there are often well-defined sets of input possibilities in certain contexts. For example, for many programming languages, the sequence "someobject." should be followed by one of the existing field names. To assist the user in such situations, the text editor can activate a popup list containing all the methods that can be accessed from the current scope.
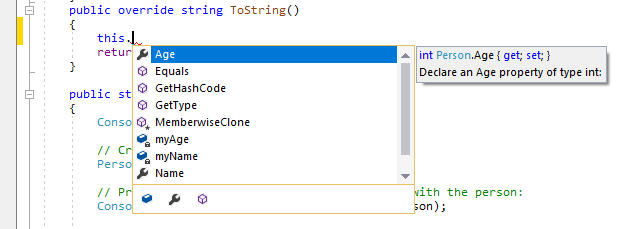
If there is a partial word immediately to the left of the current cursor position, the first entry that starts with that word is highlighted. The user can then continue typing up until the method he meant is selected or use the up and down arrow keys to navigate the list and then insert the complete method name by pressing the Enter key.
Automatic Code Completion Invocation
In most cases, the Code Completion list and Signature Help for method parameters are provided by the parser alongside the list of characters, such as period "." or open parens "(", which invoke code completion automatically as user types. The task of code completion is to have the list of available choices appear automatically as user types. For example, after a user types "someobject." the list of class members for that object is expected to appear, and after they type "somemethod(" the tooltip showing the list of parameters for that function is expected to appear. It can be customized to show those popups only if the user stops inputting for some short delay after typing the activating symbol ("." or "(").
The automatic code completion is implemented by Roslyn C# and Visual Basic parsers, TypeScript/JavaScript parsers, and Advanced C#, J#, Visual Basic, VBScript, JavaScript, C, XML, and Python parsers.
For example, automatic code completion is attempted after typing a period ('.') following a member (member access expression), typing an open brace ('(') following a member (invocation expression or object creation expression), typing a period ('.') inside using section, typing less sign ('<') inside XML comments, etc. This feature is implemented as close as possible to the Visual Studio .NET editor, so it works intuitively. On top of that, Roslyn-based parsers are configured to invoke code completion when the user starts typing identifiers.
When these parsers are used, you still can control some aspects of code completion, for example delay before code completion window appears, using the NeedCodeCompletion event, which will be discussed later. Moreover, for advanced parsers you can register your own types and objects, namespaces and assemblies for code completion using the CompletionRepository property of SyntaxParser.
To make types from most commonly used assemblies such as System, System.Drawing, and System.Windows.Forms to be available for code completion, you can call the following method
csParser1.Repository.RegisterDefaultAssemblies();
If you need to provide code completion for assemblies declared in other assemblies, you need to register these assemblies this way:
csParser1.Repository.RegisterAssembly("System.Xml");
You may need to register types for code completion that are not declared in the assembly, but present in the form of source code somewhere else.
For Roslyn-based parsers you can rely on underlying solution/project/document object model:
csParser1.Repository.RegisterCodeFiles(new string[] { "MyFile.cs" });
For one of advanced parsers you need first to create SyntaxParser, load this file into the Strings object, and then add parsed SyntaxTree to the code completion repository. The following code demonstrates how it can be accomplished:
ISyntaxParser parser = new Alternet.Syntax.Parsers.Advanced.CsParser();
parser.Strings = new TextStrings();
parser.Strings.LoadFile("MyFile.cs")
parser.ReparseText();
csParser1.CompletionRepository.RegisterSyntaxTree(parser.SyntaxTree);
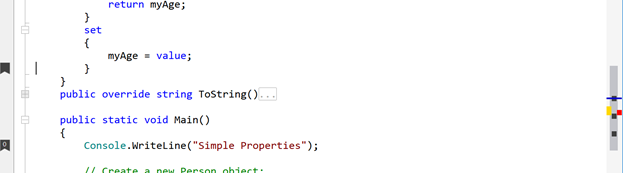
Code Outlining
The SyntaxEdit control supports outlining, a text navigation feature that can make navigation of large structured texts more effective. The essence of outlining lies in defining sections of the text as structural units that, once collapsed, can be visually replaced by a shorter representation, i.e., by an ellipsis ("..."). During the text navigation, the user can dynamically switch between the collapsed and complete representation of any particular section. Sections can be nested.
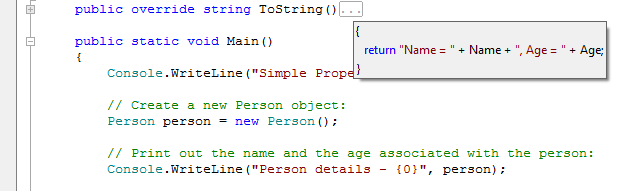
The section can be expanded by clicking on the "+" button, double-clicking the proxy text, or pressing the Ctrl+M Ctrl+M key sequence (in the default key mapping). The section can be collapsed by clicking on the "-" button or pressing the Ctrl+M Ctrl+M key sequence. All the sections can be collapsed or expanded at once using the Ctrl+M Ctrl+L key sequence.
Outlining is the property of the SyntaxEdit control itself, not of the TextSource. Thus it is possible to have two views of the same text, one with outlining and another without or even to have completely different structural parts defined.
All the aspects of the outlining are controlled via the Outlining property of the SyntaxEdit. The outlining can be enabled or disabled using the AllowOutlining property either in design time or at runtime. The look of the outlining is controlled by the OutlineColor and OutlineOptions properties.
There are two approaches to defining outline sections.
Direct Definition of Outline Sections
Outline sections can be explicitly defined by calling the appropriate methods of the Outlining property, i.e.:
edit.Outlining.Outline(new Point(0, 0), new Point(int.MaxValue, 0), 0, "...").Visible = false;`
This code snippet defines the section of the first level consisting of the entire first line of the text, using ellipsis ("...") as the proxy text and being in a collapsed state.
While this approach is simple, it has one significant drawback: if sections representing structural units are defined by the content of the text, which a user can edit, sections have to be constantly kept in sync with the text, which can be a non-trivial task.
Automatic Definition of Outline Sections Using the Syntax Parser
The syntax parsing framework has to be employed to provide automatic code outlining. This approach may seem to be more complex at first look; however, it provides consistent results. To implement this approach, a class descending from the SyntaxParser class needs to be defined, and the Outline method needs to be implemented. This method will be frequently called by the SyntaxEdit whenever the text changes, so to provide the user with a smooth editing experience, the implementation should be relatively fast.
Code Editor includes parsers that support automatic outlining for C#, Visual Basic, J#, JavaScript, VBScript, Ansi-C, SQL, HTML, XML, and Python languages.
The following example demonstrates how to implement the parser marks every line starting from the sharp ("#") sign as a separate outline section.
    private void InitializeComponent()
    {
        ...
        this.parser1 = new XParser();
        ...
    }
    public class XParser: SyntaxParser
    {
        public XParser()
        {
            Options = SyntaxOptions.Outline;
        }
        public override int Outline(IList<IRange> Ranges)
        {
            Ranges.Clear();
            for(int i = 0; i < Strings.Count; i++)
            {
                if(Strings[i].ToString().StartsWith("#"))
                {
                    Ranges.Add(new OutlineRange(
                        new Point(0, i),
                        new Point(int.MaxValue, i),
                        0, "...", false));
                }
            }
            return Ranges.Count;
        }
    }